分类目录归档:转载文章(档)

Oracle经典RMAN备份策略

RMAN 备份与恢复经典实例-TaihangMeng-ITPUB博客

1. 检查数据库模式:
   sqlplus /nolog 
   conn /as sysdba
   archive log list (查看数据库是否处于归档模式中)

   若为非归档,则修改数据库归档模式。
   startup mount
   alter database archivelog
   alter database open

2.连接到target数据库

命令: connect target  / (connect target system/oracle@ora10g,如果数据库没有起来,也可要直接在rman命令下用startup进行启动数据库) 
可以连接到target database.(rman 一边连接到target数据库,另外一边连接到control file(nocatalog mode),control file 中存储rman 的备份信息)

3.用list backupset 命令查看有没有备份的东西

4. 常用备份命令:
 备份全库:
RMAN> backup database plus archivelog delete input;     (备份全库及控制文件、服务器参数文件与所有归档的重做日志,并删除旧的归档日志)
备份表空间:
RMAN> backup tablespace system plus archivelog delete input;     (备份指定表空间及归档的重做日志,并删除旧的归档日志)_
备份归档日志:
RMAN> backup archivelog all delete input;


======================对整个数据库进行备份==================

1.对整个数据库进行全备份(full backup)。

    只要输入命令: backup database;

2.list backupset 查看备份的具体信息

List of Backup Sets
===================

BS Key  Type LV Size       Device Type Elapsed Time Completion Time
——- —- — ———- ———– ———— —————
1       Full    6.80M      DISK        00:00:02     06-DEC-08      
        BP Key: 1   Status: AVAILABLE  Compressed: NO  Tag: TAG20081206T201041
        Piece Name: /home/oracle/flash_recovery_area/ORA10G/backupset/2008_12_06/o1_mf_ncsnf_TAG20081206T201041_4mntz78s_.bkp
  Control File Included: Ckp SCN: 782019       Ckp time: 06-DEC-08
  SPFILE Included: Modification time: 06-DEC-08

BS(backupset), piece是一个文件,一个BS包含多个piece.

3.rman中缺省的参数,可以通过 show all ;
来进行查看(RMAN configuration parameters),我们在使用backup database命令中,可以把这些default value 用固定的值来进行替代.

4.我们可以把备份的文件才备份的目录中拷贝到磁带上,然后删除备份目录下面的备份文件,如果下次需要恢复的话,只要把文件重新拷回到用来的备份目录就可以了
5.查看control file 文件中的备份信息(因为我们做的备份是在nocatalog模式下),control file 在/u01/oracle/oradata/ora10g目录下,由于control file 是个二进制文件,要查看control file 文件中的内容,用strings control03.ctl,发现control03.ctl中有rman备份的信息了

 
====================0级增量备份===============

概念:全备份和0级增量备份。全备份和0级增量备份几乎是一样的。唯一的区别,0级增量备份能作为增量备份的基础,而全备份不能作为增量备份的基础。其它方面完全一致

1.backup incremental level=0(leve 0) database;(增量为0的备份)
2.backup incremental level 1(level=1) database;(增量为1的备份)
 
在上面的备份中,我们备份了datafile,controlfile和parameter file.没有备份的文件有归档日志,重做日志和口令文件没有备份.口令文件不需要备份,我们用orapw来创建一个

新的口令文件.rman 在nocatalog模式下,不能够对redo log file 进行备份


===================备份archivelog 在nocatalog模式下=================

命令:backup database plus archivelog delete input(delete input的意思在备份完成后,删除 archivelog文件,这个选项可要可不要,这个命令也可以用 backup incremental level=0(1,2…)来进行备份)


=======================备份表空间====================

backup tablespace tablespacename

如果我们不知道tablespace的名字,在rman中,可要通过report schema命令,来查看表空间的名字

MAN> report schema;
Report of database schema

List of Permanent Datafiles
===========================
File Size(MB) Tablespace           RB segs Datafile Name
—- ——– ——————– ——- ————————
1    480      SYSTEM               ***     /home/oracle/oradata/ora10g/system01.dbf
2    25       UNDOTBS1             ***     /home/oracle/oradata/ora10g/undotbs01.dbf
3    250      SYSAUX               ***     /home/oracle/oradata/ora10g/sysaux01.dbf
4    5        USERS                ***     /home/oracle/oradata/ora10g/users01.dbf
5    200      PERFSTAT             ***     /home/oracle/oradata/ora10g/perfstat.dbf

List of Temporary Files
=======================
File Size(MB) Tablespace           Maxsize(MB) Tempfile Name
—- ——– ——————– ———– ——————–
1    20       TEMP                 32767       /home/oracle/oradata/ora10g/temp01.dbf


========================备份控制文件====================

backup current controlfile

backup database include current controlfile


========================备份镜像========================

在rman的备份中有两种方式:备份集(backupset)和备份镜像(image copies).镜像备份主要是文件的拷贝:copy datafile … to …

我们在rman>report schema;

Report of database schema

List of Permanent Datafiles
===========================
File Size(MB) Tablespace           RB segs Datafile Name
—- ——– ——————– ——- ————————
1    480      SYSTEM               ***     /home/oracle/oradata/ora10g/system01.dbf
2    25       UNDOTBS1             ***     /home/oracle/oradata/ora10g/undotbs01.dbf
3    250      SYSAUX               ***     /home/oracle/oradata/ora10g/sysaux01.dbf
4    5        USERS                ***     /home/oracle/oradata/ora10g/users01.dbf
5    200      PERFSTAT             ***     /home/oracle/oradata/ora10g/perfstat.dbf

List of Temporary Files
=======================
File Size(MB) Tablespace           Maxsize(MB) Tempfile Name
—- ——– ——————– ———– ——————–
1    20       TEMP                 32767       /home/oracle/oradata/ora10g/temp01.dbf


rman>copy datafile 5 to '/u01/rmanbak/tbso1bak.dbf';(copy 5 对应的schme:perfstat.dbf)


它会把tbs作为一个拷贝。我们用list backupset来看,不能够查看我们刚备份的 tbs01bak.dbf',因为它不是backupset. 我们用list copy 就能够查看我们刚才刚刚备份的文件

 
=======================单命令与批命令=================

单命令: backup database;

批命令:

rman> run{
 2> allocate channel cha1 type disk;
 3> backup
 4> format '/u01/rmanbak/full_%t'
 5> tag full-backup //标签可以顺便起,没关系
 6> database;
 7> release channel cha1;
 8>}

这个run中有3条命令,分别用分号来进行分割.

format:
%c:备份片的拷贝数(从1开始编号);
%d:数据库名称;
%D:位于该月中的天数(DD);
%M:位于该年中的月份(MM);
%F:一个基于DBID唯一的名称,这个格式的形式为c-xxx-YYYYMMDD-QQ,其中xxx位该数据库的DBID,YYYYMMDD为日期,QQ是一个1-256的序列;
%n:数据库名称,并且会在右侧用x字符进行填充,使其保持长度为8;
%u:是一个由备份集编号和建立时间压缩后组成的8字符名称。利用%u可以为每个备份集产生一个唯一的名称;
%p:表示备份集中的备份片的编号,从1开始编号;
%U:是%u_%p_%c的简写形式,利用它可以为每一个备份片段(既磁盘文件)生成一个唯一的名称,这是最常用的命名方式;
%t:备份集时间戳;
%T:年月日格式(YYYYMMDD);

channel的概念:一个channel是rman于目标数据库之间的一个连接,"allocate channel"命令在目标数据库启动一个服务器进程,同时必须定义服务器进程执行备份和恢复操作使

用的I/O类型

通道控制命令可以用来:
      控制rman使用的OS资源
      影响并行度
      指定I/O带宽的限制值(设置 limit read rate 参数)
      指定备份片大小的限制(设置 limit kbytes)
      指定当前打开文件的限制值(设置 limit maxopenfiles)

 
=================================RMAN一周典型备份方案============================

1.星期天晚上      -level 0 backup performed(全备份)
2.星期一晚上      -level 2 backup performed
3.星期二晚上      -level 2 backup performed
4.星期三晚上      -level 1 backup performed
5.星期四晚上      -level 2 backup performed
6.星期五晚上      -level 2 backup performed
7.星期六晚上      -level 2 backup performed

 
如果星期二需要恢复的话,只需要1+2,
如果星期四需要恢复的话,只需要1+4,
如果星期五需要恢复的话,只需要1+4+5,
如果星期六需要恢复的话,只需要1+4+5+6.

自动备份:备份脚本+crontab
 bakl0
 bakl1
 bakl2

执行脚本:
rman target / msglog=bakl0.log cmdfile=bakl0 (/表示需要连接的目标数据库,msglog表示日志文件,cmdfile表示的是脚本文件)
rman target / msglog=bakl1.log cmdfile=bakl1
rman target / msglog=bakl2.log cmdfile=bakl2

实例:rman target system/oracle@ora10g(/) msglog=/u01/rmanbak/bakl1.log cmdfile=/u01/rmanbak/bakl0


完整的命令:/u01/oracle/product/10.2.0/bin/rman target system/oracle@ora10g(/) msglog=/u01/rmanbak/bakl1.log cmdfile=/u01/rmanbak/bakl0

 
把备份脚本放到/u01/rmanbak/script目录下面,vi bakl0,bakl0的内容为:

run{
    allocate channel cha1 type disk;
    backup
    incremental level  0
    format '/u01/rmanbak/inc0_%u_%T'(u表示唯一的ID,大T是日期,小t是时间)
    tag monday_inc0 //标签可以顺便起,没关系
    database;
    release channel cha1;
    }
,类似就可以写出bakl1,bakl2相应的脚本.

 
自动备份
crontab
crontab -e -u oracle(改命令的意思是编辑oracle用户的定时执行(-e,edit -u oracle,oracle用户))

分  时  日 月 星期(0代表星期天)
45 23  *  *    0    rman target / msglog=bakl0.log cmdfile=bakl0(星期天的23:45会以oracle用户的身份来执行命令)
45 23  *  *    1    rman target / msglog=bakl2.log cmdfile=bakl2
45 23  *  *    2    rman target / msglog=bakl2.log cmdfile=bakl2
45 23  *  *    3    rman target / msglog=bakl1.log cmdfile=bakl1
45 23  *  *    4    rman target / msglog=bakl2.log cmdfile=bakl2
45 23  *  *    5    rman target / msglog=bakl2.log cmdfile=bakl2
45 23  *  *    6    rman target / msglog=bakl2.log cmdfile=bakl2


然后启动crontab ,启动crontab的命令:
root> service crond restart
  
=======================RMAN恢复================

在非catalog模式下,备份的信息存储在controlfile文件中,如果controlfile文件发生毁坏,那么就不能能够进行恢复,
所以在备份的时候需要把controlfile也进行自动备份 
 
RMAN>show all;
using target database control file instead of recovery catalog
RMAN configuration parameters are:
CONFIGURE RETENTION POLICY TO REDUNDANCY 1; # default
CONFIGURE BACKUP OPTIMIZATION OFF; # default
CONFIGURE DEFAULT DEVICE TYPE TO DISK; # default
CONFIGURE CONTROLFILE AUTOBACKUP OFF; # default
CONFIGURE CONTROLFILE AUTOBACKUP FORMAT FOR DEVICE TYPE DISK TO '%F'; # default
CONFIGURE DEVICE TYPE DISK PARALLELISM 1 BACKUP TYPE TO BACKUPSET; # default
CONFIGURE DATAFILE BACKUP COPIES FOR DEVICE TYPE DISK TO 1; # default
CONFIGURE ARCHIVELOG BACKUP COPIES FOR DEVICE TYPE DISK TO 1; # default
CONFIGURE MAXSETSIZE TO UNLIMITED; # default
CONFIGURE ENCRYPTION FOR DATABASE OFF; # default
CONFIGURE ENCRYPTION ALGORITHM 'AES128'; # default
CONFIGURE ARCHIVELOG DELETION POLICY TO NONE; # default
CONFIGURE SNAPSHOT CONTROLFILE NAME TO '/home/oracle/product/10.20/dbs/snapcf_ora10g.f'; # default

其中CONFIGURE CONTROLFILE AUTOBACKUP OFF; 没有对controlfile进行 autobackup,使用我们需要运行下面命令来对controlfile进行自动备份
RMAN> CONFIGURE CONTROLFILE AUTOBACKUP ON;

RMAN> show all;

手动备份控制文件:
backup current controlfile


Dbid表示database的一个ID,将来用于恢复spfile和controlfile时候要用到.
RMAN> connect target /
connected to target database: ORA10G (DBID=3988862108)
这个Dbid=3988862108
 

RMAN> list backup;查看以前备份的信息
RMAN>delete backupset 24;//24代表backupset 的编号
RMAN>backup format '/u01/rmanbak/full_%T_%U.bak' database plus archivelog;(进行一次全备份)

验证备份:
RMAN> validate backupset 3;  //3代表backupset的编号


口令文件丢失(不属于rman备份的范畴),我们只需要用一个命令来重建这个文件就可以了:
orapw file=orapwsid password=pass entries=5;  //口令文件的路径:/u01/oracle/product/10.20/db_1/dbs目录下
oracle> cd /u01/oracle/product/10.20/db_1/dbs
oracle> rm orapwora10g;(文件删除,模拟丢失)
oracle> orapwd file=orapwora10g password=oracle entries=5;(重新建立一个文件),entries的意思(DBA的用户最多有5个)


SPFILE丢失:
startup nomount;
set dbid 3988862108;
restore spfile from autobackup;
shutdown immediate;
set dbid 3988862108;
startup;


模拟操作:
oracle> mv spfileora10g.ora spora10g.ora
oracle>rman target /;
rman> shutdown immediate;
rman> startup nomount;
startup failed: ORA-01078: failure in processing system parameters
LRM-00109: could not open parameter file '/home/oracle/product/10.20/dbs/initora10g.ora'
rman>set dbid 3988862108;
rman>restore spfile from autobackup;

执行该命令,如果没有找到的话,那可能是文件的路径发生错误.可以通过直接赋予它的文件
rman>restore spfile from '/u01/oracle/flash_recovery_area/ORA10G/autobackup/2008_12_09/o1_mf_s_673025706_4mw7xc79_.bkp

在dbs/目录下产生spfileora10g.ora文件。证明spfile 已经恢复好

rman> shutdown immediate;
rman> startup ;(如果该命令不能够启动数据库,那么需要set dbid 3988862108)


controlfile 丢失:
startup nomount;
restore controlfile from autobackup;
alter database mount;
recover database;
alter database open resetlogs;

注意:在做了alter database open resetlogs;会把online redelog file清空,数据文件丢失.所以这个时候要做一个全备份。

oracle>rm *.ctl
oracle>rman target / ;//不能够连接到rman ,因为controlfile丢失
oracle>sqlplus /nolog;


SQL>shutdown immediate; //因为controlfile丢失,不能够正常shutdown
SQL>shutdown abort;

oracle>rman target /;

rman>startup nomount;
rman>restore controlfile from autobackup;
rman>alter database mount;
rman>alter database open resetlogs;

RMAN-00571: ===========================================================
RMAN-00569: =============== ERROR MESSAGE STACK FOLLOWS ===============
RMAN-00571: ===========================================================
RMAN-03002: failure of alter db command at 12/09/2008 16:21:13
ORA-01194: file 1 needs more recovery to be consistent
ORA-01110: data file 1: '/home/oracle/oradata/ora10g/system01.dbf

//出错, redo log的scn记录在controlfile里面的,因为我们有新的controlfile,所以需要resetlogs;
 
/*
resetlogs命令表示一个数据库逻辑生存期的结束和另一个数据库逻辑生存期的开始,每次使用resetlogs命令的时候,SCN不会被重置,不过oracle会重置日志序列号,而且会重置

联机重做日志内容.
这样做是为了防止不完全恢复后日志序列会发生冲突(因为现有日志和数据文件间有了时间差)。
*/
rman>recover database;
rman>alter database open resetlogs;


Redolog file丢失:(下面的这些语句一定要在sqlplus中执行,不是在rman中执行)
 (sqlplus/nolog)
1.shutdown immediate;
2.startup mount;
3.recover database until cancel;(media recovery)
4.alter database resetlogs;


数据文件丢失(在rman中执行sql语句,在sql后面用双引号括起来):
1. sql "alter database datafile 3 offline";
2. restore datafile 3
3. recover datafile 3
4. sql "alter database datafile 3 online";


表空间丢失:
1. sql "alter tablespace users offline";//如果文件不存在,则用 sql "alter tablespace users offline immeidate";
2. restore tablespace users;
3. recover tablespace users; //与online redolog file 信息一致
4. sql "alter tablespace users online";


非catalog方式完全恢复

数据库出现问题:

1.startup nomount;
2.restore controlfile from autobackup;
3.alter database mount;
4.restore database;
5.recover database;
6.alter database open resetlogs;


模拟操作:
oracle ora10g> rm *;
oracle ora10g> ls;
oracle ora10g>  //数据文件,控制文件全部删除

oracle ora10g> rman target /; //因为controlfile 丢失,不能够连接到rman
oracle ora10g> sqlplus /nolog;
oracle ora10g> connect / as sysdba;
oracle ora10g> shutdown abort;
oracle ora10g> rman target /


rman> startup nomount;
rman> restore controlfile from autabackup;
rman> alter database mount;
rman> restore database;
rman> recover database; //online redolog 不存在

SQL>recover database until cancel; //当redo log丢失,数据库在缺省的方式下,是不容许进行recover操作的,那么如何在这种情况下操作呢
SQL>create pfile from spfile;

vi /u01/product/10.20/dbs/initora10g.ora,在这个文件的最后一行添加
*.allow_resetlogs_corruption='TRUE'; //容许resetlog corruption

 
SQL>shutdown immediate;
SQL>startup pfile='/u01/product/10.20/dbs/initora10g.ora' mount;
SQL>alter database open resetlogs;


 基于时间点的恢复:
 run{
  set until time "to_date(07/01/02 15:00:00','mm/dd/yy hh24:mi:ss')";
  restore database;
  recover database;
  alter database open resetlogs;
}

ALTER SESSION SET NLS_DATE_FORMAT='YYYY-MM-DD HH24:MI:SS';
1.startup mount;
2.restore database until time "to_date('2009-7-19 13:19:00','YYYY-MM-DD HH24:MI:SS')";
3.recover database until time "to_date('2009-7-19 13:19:00','YYYY-MM-DD HH24:MI:SS')";
4.alter database open resetlogs;


如果有open resetlogs,都是不完整恢复.


基于 SCN的恢复:
1.startup mount;
2.restore database until scn 10000;
3.recover database until scn 10000;
4.alter database open resetlogs;


基于日志序列的恢复:
1.startup mount;
2.restore database until SEQUENCE 100 thread 1; //100是日志序列
3.recover database until SEQUENCE 100 thread 1;
4.alter database open resetlogs;

日志序列查看命令: SQL>select * from v$log;其中有一个sequence字段.resetlogs就会把sequence 置为1


=================================RMAN catalog模式下的备份与恢复=====================

1.创建Catalog所需要的表空间
SQL>create tablespace rman_ts size datafile '/u01/oracle/oradata/ora10g/rmants.dbf' 20M;
 

2.创建RMAN用户并授权
SQL>create user rman identified by rman default tablespace rman_ts quota unlimited on rman_ts;
SQL>grant recovery_catalog_owner to rman;(grant connect to rman)

 
查看角色所拥有的权限: select * from dba_sys_privs where grantee='RECOVERY_CATALOG_OWNER';
(RECOVER_CATALOG_OWNER,CONNECT,RESOURCE)

3.创建恢复目录
oracle>rman catalog rman/rman
RMAN>create catalog tablespace rman_ts;
RMAN>register database;(database是target database)

database registered in recovery catalog
starting full resync of recovery catalog
full resync complete

RMAN> connect target /;

以后要使用备份和恢复,需要连接到两个数据库中,命令:

oracle>rman target / catalog rman/rman (第一斜杠表示target数据库,catalog表示catalog目录 rman/rman表示catalog用户名和密码)

命令执行后显示:

Recovery Manager: Release 10.2.0.1.0 – Production on Wed Dec 10 15:00:42 2008
Copyright (c) 1982, 2005, Oracle.  All rights reserved.
connected to target database: ORA10G (DBID=3988862108)
connected to recovery catalog database


命令解释:
Report schema              Report shema是指在数据库中需找schema
List backup                   从control读取信息
Crosscheck backup       看一下backup的文件,检查controlfile中的目录或文件是否真正在磁盘上
Delete backupset 24    24代表backupset 的编号, 既delete目录,也delete你的文件


注意:在做了alter database open resetlogs;会把online redelog file清空,数据文件丢失.所以这个时候要做一个全备份。

resetlogs命令表示一个数据库逻辑生存期的结束和另一个数据库逻辑生存期的开始,每次使用resetlogs命令的时候,SCN不会被重置,不过oracle会重置日志序列号,而且会重置

联机重做日志内容.这样做是为了防止不完全恢复后日志序列会发生冲突(因为现有日志和数据文件间有了时间差)。


Rman 归档文件丢失导致不能备份的,在备份前先执行以下两条命令
crosscheck archivelog all;
delete expired archivelog all;


Oracle rman 命令总结-j04212-ITPUB博客

–登录rman
  rman target /
  rman target sys/passwork
  rman target sys/passwork nocatalog   (控制文件方式)
  rman target sys/passwork catalog     (恢复目录方式)


–查看参数
  show all


–修改保存天数
  用sqlplus修改备份信息在控制文件中保留的天数
  show parameter control_file_record_keep_time

  alter system set control_file_record_keep_time=30 scope=spfile
  shutdown immediate
  startup


–rman数据库冷备份
  shutdown immediate;
  startup mount;
  backup database format='/u01/backup/rman/%d_%T_%s.bak';
  alter database open;
  sql 'alter system archive log current';


–rman数据库热备份
  backup database format='/u01/backup/rman/%d_%T_%s.bak';
  sql 'alter system archive log current';


–备份表空间
  backup tablespace emp;


–备份数据文件
  backup datafile '/u01/mytest.dbf';
  backup datafile 5 format='/u01/backup/rman/%N_%s.dbf';


–备份归档日志
  backup archivelog all
  backup archivelog from time 'sysdate-1'
  backup archivelog from sequence 400
  backup archivelog all delete input
  backup archivelog from sequence 400 delete input

  format='/u01/backup/rman/ar%T_%s.arc'   –指定路径 %T 日期


–备份过去一天的归档文件
  backup format='/u01/backup/rman/ar%d_%s.arc'
  archivelog
  from time='sysdate-1' until time='sysdate';


–备份数据文件和归档日志
  backup format='/u01/backup/rman/t%d_%s.bak' tablespace emp plus archivelog;


–备份控制文件
  backup current controlfile format='/u01/backup/rman/%d_%s.ctl';


–备份spfile
  backup spfile format='/u01/backup/rman/spf%d_%s.par';


–压缩备份集
backup as compressed backupset tablespace emp;


–建立控制文件映像副本
copy current controlfile to '/u01/backup/rman/dbtest.ctl';
backup as copy format='/u01/backup/rman/dbtest01.ctl' current controlfile;


–建立数据文件映像副本
backup as copy format='/u01/backup/rman/8.dbf' datafile 8;


–rman维护命令
list backup                                    –列出全部的备份信息
list backup of database                        –列出数据库备份
list backup of tablespace emp                  –列出指定的表空间备份
list backup of datafile 5                      –列出指定的数据文件备份
list backup of controlfile                     –列出控制文件备份
list backup of spfile                          –列出spfile备份
list archivelog all                            –列出归档日志
list backup of archivelog all                  –列出归档日志的备份

list backup of database summary                –列出可用的备份
list backup of tablespace emp summary          –关于表空间的备份
list backup by file                            –按文件类型列出备份
list expired backup of archivelog all summary  –失效的备份

report obsolete                                –查看过期的
delete obsolete                                –删除过期的

list recoverable backup of database            –列出有效的备份
list expired backup                            –列出失效的备份

list expired backup of archivelog all          –列出失效的归档日志备份
list expired backup of archivelog
     until sequence 5                          –列出指定序列号的失效归档日志备份
list expired backup of archivelog
     until time "to_date('2012-6-30','yyyy-mm-dd')"   
                                               –列出指定时间的失效归档日志备份备份

list copy                                      –列出映像文件副本 
list copy of database
list copy of tablespace emp
list copy of datafile 6
list copy of archivelog all
list copy of controfile

report schema
report need backup                             –列出需要备份的
report need backup days 2 database             –列出超过2天没有备份的

mount状态下
list incarnation;
reset database to incarnation 980;


–删除失效文件
删除失效备份
crosscheck backup(copy,archivelog all);
delete expired backup(copy,archivelog all);


删除失效日志
crosscheck archivelog all; 
delete expired archivelog all;

crosscheck backup of tablespace sysaux        –检查表空间备份
crosscheck backup of datafile 2               –检查数据文件2备份
crosscheck backup of controlfile              –检查控制文件备份
crosscheck backup of spfile                   –检查spfile
crosscheck backup of copy                     –检查copy
crosscheck backup completed after 'sysdate-2'  –当前时间前2天的备份

crosscheck copy of database
crosscheck copy of tablespace emp
crosscheck copy of controlfile
crosscheck copy of spfile

list backup summary                 –获得主键
validate backupset 16               –验证备份集16的有效性
change                              –修改备份状态
change backupset 16 unavailable
change backupset 16 available
change archivelog '/u01/backup/rman/***.log' unavailable

change backupset 16 delete                  –删除备份集16(同步删除)
delete expired backupset(archivelog all);   –删除失效

delete expired   –删除失效备份
delete obsolete  –删除旧于备份策略日期(过期)的备份


–恢复检查
restore database validate;
validate backupset 218;

restore database preview;
restore tablespace users preview;
restore datafile 5 preview;


–命令块
run{
2> shutdown immediate;
3> startup mount;
4> allocate channel d1 type disk;
5> backup as backupset database
6> format='/u01/backup/rman/%d_%T.bak';
7> alter database open;
8> sql 'alter system archive log current';
9> }

select * from v$log;
select * from v$archived_log;
select * from v$backup_redolog;


–恢复顾问
list failure       –诊断错误
advise failure     –建议
repair failure     –修复(数据文件和控制文件)


–rman下对数据文件重命名
run{
2> sql 'alter tablespace yesorno offline';
3> set newname for datafile '/u01/app/oracle/oradata/yesorno.dbf'
4> to '/u01/app/oracle/oradata/yesorno01.dbf';
5> restore tablespace yesorno;
6> switch datafile all;
7> recover tablespace yesorno;
8> sql 'alter tablespace yesorno online';
}


–rman下对数据文件移动
run{
2> sql 'alter tablespace yesorno offline';
3> set newname for datafile '/u01/app/oracle/oradata/yesorno01.dbf'
4> to '/u01/app/oracle/oradata/dbtest/yesorno01.dbf';
5> restore tablespace yesorno;
6> switch datafile all;
7> recover tablespace yesorno;
8> sql 'alter tablespace yesorno online';
}


Oracle 中control_file_record_keep_time参数的解释

Oracle 中control_file_record_keep_time参数的解释 – CSDN博客


Oracle基于RMAN的备份方式,可分为以catalog 和nocatalog的两种方式进行备份管理。其中,catalog的方式需要一个catalog目录数据库,这个数据库一般运行在另外一台服务器上,这种方式可以用于用户有多个Oracle数据库的环境,同时对数据库的备份恢复信息也可以长久的保存,也就是RMAN把对数据库A的备份恢复记录保留在catalog目录数据库中。

而基于nocatalog的备份管理方式,是将RMAN的备份信息放在控制文件中,由于控制文件的大小不能无限增大,所以在控制文件中只能保留一段时间的备份与恢复信息,而这个时间的控制,由一个参数为参考依据,这个参数就是control_file_record_keep_time,通过在sqlplus中show parameter control_file_record_keep_time 可以查到这个参数的值,默认为7天。


SQL> show parameter control_file_record_keep_time

NAME                     TYPE     VALUE

———————————— ———– ————————–

control_file_record_keep_time         integer     7

metalink中对此参数的解释为:

CONTROL_FILE_RECORD_KEEP_TIME specifies the minimum number of days

before a reusable record in the control file can be reused. In the event a new record needs to be added to a reusable section and the oldest record has not aged enough, the record section expands. If this parameter is set to 0, then reusable sections never expand, and records are reused as needed


Note:

This parameter applies only to records in the control file that are circularly reusable (such as archive log records and various backup records). It does not apply to records such as datafile, tablespace, and redo thread records, which are never reused unless the corresponding object is dropped from the tablespace.


这段话的意思是说:control_file_record_keep_time表示控制文件里可重复使用的记录所能保存的最小天数。如果新增加一条记录 到控制文件可以重复使用的部分,这时最老的记录尚没有超出最小保留天数,那么记录将控制文件的这一部分将扩展。如果将该参数设置为0,那么控制文件可以重 复使用的部分将永远不会扩展。


注意,这个参数只应用于控制文件中可循环利用的部分,如归档日志文件,各种备份记录。不应用于诸如数据文件,表空间,重做线程等,这些内容只有当其从对应的表空间中删除后才能重用。


可重用的部分包括如下几种类型(可以通过查询视图$contofile_record_section得到):

ARCHIVED LOG

BACKUP CORRUPTION

BACKUP DATAFILE

BACKUP PIECE

BACKUP REDO LOG

BACKUP SET

COPY CORRUPTION

DATAFILE COPY

DELETED OBJECT

LOGHISTORY

OFFLINERANGE


而MAXLOGHISTORY参数,其意义在于限制控制文件里和通过v$log_history视图的归档日志文件数目。归档日志最多维持在MAXLOGHISTORY所设置的数目。如果超过这个数目,将从头覆盖以前的归档日志文件项。


最终,当归档日志数目超过MAXLOGHISTORY所设定的值时,v$log_history中的所有项都将被覆盖。


当创建控制文件时,MAXLOGHISTORY的决定为归档日志信息分配多大的空间。MAXLOGHISTORY并不动态增加。当日志归档时,该归档文件的信息将被更新到控制文件。只有在如下情况下,才覆盖原来的项:

控制文件中该区域所有项都被使用并且有一项超出了control_file_record_keep_time设定的时间


当使用RMAN目录时,control_file_record_keep_time保存的时间不能比同步目录的时间间隔短。换句话说,如果每天备份一次,那么controlfile_record_keep_time不能少于1。


如果不使用RMAN目录,应该设置control_file_record_keep_time为你需要往后恢复的最大天数。


在Oracle 7中,将新归档日志记录记录到v$log_histroy中。当达到MAXLOGHISTORY的极限时,插入新记录,同时覆盖最老的记录。在8.0版本 后,v$log_history视图被v$archived_log取代了,并且maxloghistory不限制能够插入到v$archived_log中的记录数。


有人问:为什么我在创建控制文件时指定的MAXLOGHISTORY没有起作用?

例如,创建控制文件时,设定MAXLOGHISTORY参数为100,控制文件的

Log History区域将创建227个记录。这是一个可预料到的结果。


创建控制文件时,每个部分分配规定的大小和空间。每个部分的空间分配不是依据记录数,而是根据Oracle的块。控制文件中,每个部分的单条记录大小是固 定的,都是36字节。因此,100个记录(MAXLOGHISTORY)需要3600个字节。依据Oracle的块大小————控制文件中设置的db_lock_size,控制文件块大小也是DB_BLOCK_SIZE参数。特定数目的块将为Log History部分分配。例如,如果DB_BLOCK_SIZE为8192,那么一个块就足够了。在这个块中,我们有8192/36,大约227个记录。 如果DB_BLOCK_SIZE 为2048,那么将分配2个快,但是只创建113个记录。

MAXLOGHISTORY的最大值可以设置为65535。不得超过这个数。

1.新建目录
cd /u01/PTEST
mkdir rmanbackup
cd rmanbackup
mkdir data logs scripts
chown -hR oraptest:dba data logs scripts
chmod -R 777 data logs scripts
2.将文件放进scripts文件夹


CONFIGURE RETENTION POLICY TO REDUNDANCY 7;
CONFIGURE BACKUP OPTIMIZATION ON;
CONFIGURE CONTROLFILE AUTOBACKUP ON;
CONFIGURE CONTROLFILE AUTOBACKUP FORMAT FOR DEVICE TYPE DISK TO '/u01/PTEST/rmanbackup/data/%F';
CONFIGURE DEVICE TYPE DISK PARALLELISM 5 BACKUP TYPE TO COMPRESSED BACKUPSET;
CONFIGURE CHANNEL DEVICE TYPE DISK MAXOPENFILES 50 MAXPIECESIZE 32G;

nohup ./db_0_bak.sh &

数据库用户去执行:
crontab -e
#add for DEV rmanbackup
00 01 * * 0 /u01/DEV/rmanbackup/scripts/db_0_bak.sh
00 01 * * 1-6 /u01/DEV/rmanbackup/scripts/db_1_bak.sh

最后,可以在var/spool/cron里面看到用户的自动执行命令

执行一条命令:把所有的数据都移动到另外文件夹,只在rmanbackup里面留前一天的数据


Oracle 回滚(ROLLBACK)和撤销(UNDO)

一、回滚(ROLLBACK)和撤销(UNDO)

    回滚和前滚是保证Oracle数据库中的数据处于一致性状态的重要手段。   

    在9i版本以前

        Oracle使用数据库中的回滚段来实现未提交数据或因系统故障导致实例崩溃时进行回滚操作

        每一个表空间需要创建回滚段,各个表空间对回滚段实现各自的管理

    在9i及后续版本

        提供了一种新的回滚数据的管理方式,即使用Oracle自动管理的撤销(Undo)表空间

        自动撤销管理表空间统一管理所有DML的回滚操作,简化了对于回滚工作的管理

        在9i,10g中的回滚段仅仅用作保留向后兼容

        撤销段代替了原有版本中的回滚段,因此本文所有描述均使用撤销   

    撤销的实质意味着将所作的修改退回到修改前的状态,即倒退所有DML语句。       

二、撤销段中的内容及相关特性

    对于任何DML操作而言,必须同时处理数据块和撤销块,并且还会生成重做信息

    在ACID中,A、C、I要求生成撤销,D则要求生成重做

    INSERT:

        撤销段记录插入记录的rowid,如果需要撤销,则根据rowid将该记录删除即可

    UPDATE:

        撤销段记录被更新字段的原始值,撤销时将原始值覆盖新值即可

    DELETE:

        撤销段记录整行的数据,撤销时执行反向操作将该记录插入原表


    由上可知,UNDO段中的内容总结如下:

        数据为修改之前的副本

        从每个改变数据的事务中获得

        在事务结束前一直被保留   

    UNDO段中数据的作用:

        用于回滚操作

        读一致性和闪回查询

        用于事务失败时的恢复       

    UNDO段与事务:

        一个事物的启动,Oracle将为其分配仅仅一个UNDO段,若该段用完,则Oracle会自动为该UNDO段添加另一个区间(extent)

        一个UNDO段能够同时为多个事务服务       

    UNDO段与UNDO表空间:

        UNDO段中的内容存储在UNDO表空间

        任意给定时刻只能使用一个UDNO表空间

        UNDO表空间必须被创建为持久的、本地管理、可自动扩展的表空间

        正在使用的UNDO表空间不能撤销或删除

        UNDO表空间使用循环写的方式,与联机日志文件写相似,不同的是UNDO中可以设置了undo_retention 保留时间   

    UNDO段的两种管理方式:

        AUTO    自动管理(推荐)

        MANUAL  手动管理(仅保留)           

三、与撤销相关的几个参数

    –查看本机中Oracle的版本

        SQL> SELECT * FROM v$version;

        BANNER

        —————————————————————-

        Oracle Database 10g Enterprise Edition Release 10.2.0.1.0 – Prod

        PL/SQL Release 10.2.0.1.0 – Production

        CORE    10.2.0.1.0      Production

        TNS for Linux: Version 10.2.0.1.0 – Production

        NLSRTL Version 10.2.0.1.0 – Production

    –查看和UNDO相关的参数

        SQL> SHOW PARAMETER undo;

        NAME                                 TYPE        VALUE

        ———————————— ———– ——————————

        undo_management                      string      MANUAL

        undo_retention                       integer     900

        undo_tablespace                      string      UNDOTBS1


    undo_management:

        设置数据库的撤销段是否使用自动管理模式,值可以为auto或manual,当为manual时将不使用撤销段,即不使用自动管理模式

        该参数为静态参数,修改后需重启实例才能生效      

    undo_retention:

        指定撤销段数据在undo段中为非活动状态后被覆盖前保留的时间,单位为秒。在undo_management位auto时生效,为动态参数


    undo_tablespace:

        指定使用哪个表空间来实现数据的撤销,在undo_management位auto时生效,为动态参数       

    retention guarantee子句:

        保证撤销保留,使用下面的操作来实现

            ALTER TABLESPACE undo_tablespace_name RETENTION GUARANTEE;

    –下面的查询中是当undo_management为manual时的结果集,可以看出撤销表空间的撤销段都处于offline状态   

        SQL> SELECT segment_name,tablespace_name,status FROM dba_rollback_segs;


        SEGMENT_NAME                   TABLESPACE_NAME                STATUS

        —————————— —————————— —————-

        SYSTEM                         SYSTEM                         ONLINE

        _SYSSMU1$                      UNDOTBS1                       OFFLINE

        _SYSSMU2$                      UNDOTBS1                       OFFLINE

        _SYSSMU3$                      UNDOTBS1                       OFFLINE

        _SYSSMU4$                      UNDOTBS1                       OFFLINE

        _SYSSMU5$                      UNDOTBS1                       OFFLINE

        _SYSSMU6$                      UNDOTBS1                       OFFLINE

        _SYSSMU7$                      UNDOTBS1                       OFFLINE

        _SYSSMU8$                      UNDOTBS1                       OFFLINE

        _SYSSMU9$                      UNDOTBS1                       OFFLINE

        _SYSSMU10$                     UNDOTBS1                       OFFLINE


    –在undo_management 参数为manual时,对scott.emp插入一条新记录,收到了错误提示

    –非系统表空间不能够使用回滚段

        SQL> INSERT INTO scott.emp(empno,ename,salary)

          2  VALUES(6666,'Jenney',3000);

        INSERT INTO scott.emp(empno,ename,salary)

                          *

        ERROR at line 1:

        ORA-01552: cannot use system rollback segment for non-system tablespace 'USERS'


    –查看段的类型,发现仅仅system表空间存在ROLLBACK 段,所以前一条插入语句收到错误提示

        SQL> SELECT DISTINCT segment_type,tablespace_name FROM dba_segments

          2  ORDER BY tablespace_name;


        SEGMENT_TYPE       TABLESPACE_NAME

        —————— ——————————

        INDEX              EXAMPLE

        INDEX PARTITION    EXAMPLE

        LOBINDEX           EXAMPLE

        LOBSEGMENT         EXAMPLE

        NESTED TABLE       EXAMPLE

        TABLE              EXAMPLE

        TABLE PARTITION    EXAMPLE

        INDEX              SYSAUX

        INDEX PARTITION    SYSAUX

        LOB PARTITION      SYSAUX

        LOBINDEX           SYSAUX


        SEGMENT_TYPE       TABLESPACE_NAME

        —————— ——————————

        LOBSEGMENT         SYSAUX

        NESTED TABLE       SYSAUX

        TABLE              SYSAUX

        TABLE PARTITION    SYSAUX

        CLUSTER            SYSTEM

        INDEX              SYSTEM

        LOBINDEX           SYSTEM

        LOBSEGMENT         SYSTEM

        NESTED TABLE       SYSTEM

        ROLLBACK           SYSTEM       –与之前的版本兼容的回滚段

        TABLE              SYSTEM


        SEGMENT_TYPE       TABLESPACE_NAME

        —————— ——————————

        TABLE              TBS1

        TYPE2 UNDO         UNDOTBS1     –9i之后使用的撤销段

        INDEX              USERS

        LOBINDEX           USERS

        LOBSEGMENT         USERS

        NESTED TABLE       USERS

        TABLE              USERS


        –下面将undo_management改为支持自动管理,需要重启实例

        SQL> ALTER SYSTEM SET undo_management = 'auto' SCOPE = SPFILE;


        System altered.


        SQL> SHUTDOWN IMMEDIATE;

        Database closed.

        Database dismounted.

        ORACLE instance shut down.

        SQL> STARTUP;

        ORACLE instance started.


        Total System Global Area  251658240 bytes

        Fixed Size                  1218796 bytes

        Variable Size              67110676 bytes

        Database Buffers          180355072 bytes

        Redo Buffers                2973696 bytes

        Database mounted.

        Database opened.


    –再次查看dba_rollback_segs视图所有的撤销段全部处于online状态

    –注意第一行为system表空间的撤销段,用于系统表空间的撤销

        SQL> SELECT segment_name,tablespace_name,status FROM dba_rollback_segs;


        SEGMENT_NAME                   TABLESPACE_NAME                STATUS

        —————————— —————————— —————-

        SYSTEM                         SYSTEM                         ONLINE 

        _SYSSMU1$                      UNDOTBS1                       ONLINE

        _SYSSMU2$                      UNDOTBS1                       ONLINE

        _SYSSMU3$                      UNDOTBS1                       ONLINE

        _SYSSMU4$                      UNDOTBS1                       ONLINE

        _SYSSMU5$                      UNDOTBS1                       ONLINE

        _SYSSMU6$                      UNDOTBS1                       ONLINE

        _SYSSMU7$                      UNDOTBS1                       ONLINE

        _SYSSMU8$                      UNDOTBS1                       ONLINE

        _SYSSMU9$                      UNDOTBS1                       ONLINE

        _SYSSMU10$                     UNDOTBS1                       ONLINE


    由上面的示例可知:

        ROLLBACK 段:      –与之前的版本兼容的回滚段

        TYPE2 UNDO 段:    –9i之后使用的撤销段

        关于回滚,一个时刻仅能使用一种类段类型,即要么使用与以前版本兼容的回滚段,要么使用撤销段

        事实上,在9i之后仅仅支持撤销段,从上面错误的提示即可证实


    –查看DML语句产生的事务

        SQL> SHOW USER;                                   

        USER is "SYS"

        SQL> SELECT * FROM scott.emp WHERE ename = 'SCOTT';


             EMPNO ENAME           JOB              MGR HIREDATE      SALARY     DEPTNO

        ———- ————— ——— ———- ——— ———- ———-

              7788 SCOTT           ANALYST         7566 19-APR-87       3500         20


        SQL> UPDATE scott.emp SET sal = sal * 2 WHERE  ename = 'SCOTT';


        1 row updated.


        SQL> SELECT addr,xidusn,status,start_time,used_ublk

          2  FROM v$transaction;


        ADDR         XIDUSN STATUS           START_TIME            USED_UBLK

        ——– ———- —————- ——————– ———-

        2DA2B17C          9 ACTIVE           07/10/10 20:29:08             1


    –查看当前哪些用户使用撤销段以及段的大小,启动时间,活动状态等

        SQL> SELECT t.xidusn,t.start_time,t.used_ublk,t.status,

                s.username,r.segment_name

             FROM v$transaction t

                JOIN v$session s

                    ON t.ses_addr = s.saddr

                JOIN dba_rollback_segs r

                    ON r.segment_id = t.xidusn ;


            XIDUSN START_TIME            USED_UBLK STATUS           USERNAME                       SEGMENT_NAME

        ———- ——————– ———- —————- —————————— ————-

                 9 07/10/10 20:29:08             1 ACTIVE           SYS                            _SYSSMU9$


四、UNDO表空间的创建与管理 

    创建UNDO表空间

        创建语法:

           CREATE UNDO TABLESPACE tablespace_name DATAFILE '…' SIZE n


        更多表空间的创建:

            请参照:Oracle 表空间与数据文件


    切换UNDO表空间 

        实例中允许多个UNDO表空间存在

        可以从一个UNDO表空间切换到另外一个UNDO表空间

        任一时刻只能有一个UNDO表空间被指定

        使用ALTER SYSTEM SET undo_tablespace = undo_tablespace_name实现切换


    删除UNDO表空间

        DROP TABLESPACE undo_tablespace_name

        任意实例的UNDO表空间在非活动状态可以删除

        对于活动状态的UNDO表空间,应当先将切换到其它表空间,在所有事务完成后再删除该表空间


    演示创建、切换及删除UNDO表空间

    –查看当前系统中的表空间   

        SQL> SELECT file_name,tablespace_name FROM dba_data_files;


        FILE_NAME                                                    TABLESPACE_NAME

        ———————————————————— ——————————

        /u01/app/oracle/oradata/orcl/tbs1_2.dbf                      TBS1

        /u01/app/oracle/oradata/orcl/tbs1_1.dbf                      TBS1

        /u01/app/oracle/oradata/orcl/example01.dbf                   EXAMPLE

        /u01/app/oracle/oradata/orcl/users01.dbf                     USERS

        /u01/app/oracle/oradata/orcl/sysaux01.dbf                    SYSAUX

        /u01/app/oracle/oradata/orcl/undotbs01.dbf                   UNDOTBS1

        /u01/app/oracle/oradata/orcl/system01.dbf                    SYSTEM


    –创建一个新的UNDO表空间undo2

        SQL> CREATE UNDO TABLESPACE undo2

          2  DATAFILE '/u01/app/oracle/oradata/orcl/undotbs02.dbf' SIZE 3M

          3  AUTOEXTEND ON;


        Tablespace created.


        SQL> SELECT file_name,tablespace_name FROM dba_data_files WHERE tablespace_name LIKE 'UNDO%';


        FILE_NAME                                                    TABLESPACE_NAME

        ———————————————————— ——————————

        /u01/app/oracle/oradata/orcl/undotbs01.dbf                   UNDOTBS1

        /u01/app/oracle/oradata/orcl/undotbs02.dbf                   UNDO2


    –查看当前系统使用的UNDO表空间为UNDOTBS1

        SQL> SELECT name,value FROM v$parameter WHERE name LIKE 'undo%';


        NAME                           VALUE

        —————————— ————————————————–

        undo_management                AUTO

        undo_tablespace                UNDOTBS1

        undo_retention                 900


    –创建一张表tb_test用于演示,假定该会话为session1

        SQL> CREATE TABLE tb_test

          2  (

          3      ID INT,

          4      Name VARCHAR2(20)

          5  );


        Table created.


    –插入一条记录到tb_test,此时未提交将产生UNDO 信息

        SQL> INSERT INTO tb_test SELECT 1,'Robinson' FROM dual;


        1 row created.


    –此时打开另外一个回话,假定为session2,在session2中切换表空间

        SQL> ALTER SYSTEM SET undo_tablespace = 'undo2'; 


        System altered.   –undotbs1中有未提交的事务,竟然可以成功切换?如此这般闪回时估计会有问题


        SQL> SHOW PARAMETER undo;


        NAME                                 TYPE        VALUE

        ———————————— ———– ——————————

        undo_management                      string      AUTO

        undo_retention                       integer     900

        undo_tablespace                      string      undo2


        –在session1中执行commit

        SQL> COMMIT;


        Commit complete.   –成功执行了commit,且下面的查询看到了提交后的结果


        SQL> SELECT * FROM tb_test;


                ID NAME

        ———- ——————————

                 1 Robinson


    –登出系统后再次查看,结果依然存在,比较纳闷       

        SQL> exit

        Disconnected from Oracle Database 10g Enterprise Edition Release 10.2.0.1.0 – Production

        With the Partitioning, OLAP and Data Mining options

        [uniread] Saved history (716 lines)

        [oracle@robinson ~]$ sqlplus / as sysdba;


        SQL*Plus: Release 10.2.0.1.0 – Production on Sat Jul 10 21:29:36 2010


        Copyright (c) 1982, 2005, Oracle.  All rights reserved.


        Connected to:

        Oracle Database 10g Enterprise Edition Release 10.2.0.1.0 – Production

        With the Partitioning, OLAP and Data Mining options


        SQL> SELECT * FROM tb_test;


                ID NAME

        ———- ——————–

                 1 Robinson


    –删除UNDO表空间

    –在session1中插入一条新记录

        SQL> INSERT INTO tb_test SELECT 2,'Jack' FROM DUAL;


        1 row created.


    –在session2中将撤销表空间切换为undotbs1

        SQL> ALTER SYSTEM SET undo_tablespace = 'undotbs1';


        System altered.


    –紧接着在该回话中删除undo2,提示正在使用

        SQL> DROP TABLESPACE undo2;

        DROP TABLESPACE undo2

        *

        ERROR at line 1:

        ORA-30013: undo tablespace 'UNDO2' is currently in use


    –在session1中提交事务

        SQL> COMMIT;


        Commit complete.

    –在session2中再次删除表空间undo2,收到了相同的错误提示

        SQL> /

        DROP TABLESPACE undo2

        *

        ERROR at line 1:

        ORA-30013: undo tablespace 'UNDO2' is currently in use


        SQL> SHOW PARAMETER undo   –查看的确是已切换到undotbs1


        NAME                                 TYPE        VALUE

        ———————————— ———– ——————————

        undo_management                      string      AUTO

        undo_retention                       integer     900

        undo_tablespace                      string      undotbs1


    –在session2中再次执行表空间切换到undotbs1

        SQL> ALTER SYSTEM SET undo_tablespace = 'undotbs1';


        System altered.


    –此时undo2成功删除,可以看出需要在将活动事务提交或回滚后,再切换之后才能成功删除撤销表空间

        SQL> DROP TABLESPACE undo2;


        Tablespace dropped.


        SQL> ho ls $ORACLE_BASE/oradata/orcl;

        control01.ctl  redo03.log   redo2.log     system01.dbf   undotbs02.dbf

        control02.ctl  redo04.log   redo3.log     tbs1_1.dbf     users01.dbf

        example01.dbf  redo07.log   redo7.log     tbs1_2.dbf

        redo01.log     redo08.log   redo8.log     temp01.dbf

        redo02.log     redo1.log    sysaux01.dbf  undotbs01.dbf


    –删除UNDO表空间的物理文件

        SQL> ho rm $ORACLE_BASE/oradata/orcl/undotbs02.dbf;


    –在session1中可以看到两条记录也被成功插入

        SQL> SELECT * FROM tb_test;                   


                ID NAME

        ———- ——————–

                 1 Robinson

                 2 Jack


    –查看当前撤销表空间的大小

        SQL> SELECT tablespace_name,bytes/1024/1024 FROM dba_data_files

          2  WHERE tablespace_name = 'UNDOTBS1';


        TABLESPACE_NAME                BYTES/1024/1024

        —————————— —————

        UNDOTBS1                                    30


    –循环插入记录到tb_test后查看undo表空间的使用情况

        SQL> BEGIN

          2  FOR i IN 1..20000

          3  LOOP

          4     INSERT INTO tb_test VALUES(i,'Unkown Name');

          5  END LOOP;

          6  END;

          7  /


        PL/SQL procedure successfully completed.   


    –可以看到UNDO 表空间只用了个块

        SQL> SELECT addr,xidusn,used_ublk FROM v$transaction;


        ADDR         XIDUSN  USED_UBLK

        ——– ———- ———-

        2D9FC160          6        174


        SQL> SELECT 174 * 8 || 'KB' FROM dual;


        174*8|

        ——

        1392KB


五、计算UNDO表空间的大小

    计算公式:

        MAX(undoblks)/600 * MAX(maxquerylen)   位于v$undostat

           * db_block_size                     位于v$parameter


    –创建演示环境

        SQL> INSERT INTO tb_test SELECT employee_id,first_name FROM hr.employees;


        107 rows created

        SQL> INSERT INTO tb_test SELECT * from tb_test;


        109 rows created.


    –多次执行上述命令,下面是的tb_test表中的记录数

        SQL> /


        892928 rows created.

        SQL> COMMIT;


        Commit complete.


    –查看当前undo表空间的大小

        SQL> SELECT t.name,d.name,d.bytes/1024/1024 as TotalSize ,t.flashback_on,d.status

          2  FROM v$tablespace t

          3  JOIN v$datafile d

          4  USING (ts#)

          5  WHERE t.name LIKE 'UNDO%';


        NAME                              NAME                                         TOTALSIZE FLA STATUS

        ——————————— ——————————————- ———- — ——-

        UNDOTBS1                          /u01/app/oracle/oradata/orcl/undotbs01.dbf          30 YES ONLINE


    –将undo表空间修改为RETENTION GUARANTEE及关闭自动扩展

        SQL> ALTER TABLESPACE undotbs1 RETENTION GUARANTEE;


        Tablespace altered.


        SQL> ALTER DATABASE DATAFILE '/u01/app/oracle/oradata/orcl/undotbs01.dbf' AUTOEXTEND OFF;

        Database altered.   

        SQL> SELECT tablespace_name,contents,retention FROM dba_tablespaces

          2  WHERE tablespace_name LIKE 'UNDO%';


        TABLESPACE_NAME                CONTENTS  RETENTION

        —————————— ——— ———–

        UNDOTBS1                       UNDO      GUARANTEE


    –修改保留时间为分钟

        SQL> ALTER SYSTEM SET undo_retention = 120;


        System altered.


    –循环删除tb_test中的记录,提示undo表空间空间容量不够

        SQL> BEGIN

          2      FOR i IN 1..1000    

          3          LOOP

          4              DELETE FROM tb_test WHERE rownum < 1001;

          5              COMMIT;

          6          END LOOP;

          7  END;

          8  /

        BEGIN

        *

        ERROR at line 1:

        ORA-30036: unable to extend segment by 8 in undo tablespace 'UNDOTBS1'

        ORA-06512: at line 4       

    –修改回话的时间参数

        SQL> ALTER SESSION SET nls_date_format='yyyy-mm-dd HH24:MI:SS';

        Session altered.

    –查看v$undostat视图,获得相关信息

        SQL> SELECT begin_time,end_time,undoblks,maxquerylen, ssolderrcnt,nospaceerrcnt

          2   FROM v$undostat;


        BEGIN_TIME          END_TIME              UNDOBLKS MAXQUERYLEN SSOLDERRCNT NOSPACEERRCNT

        ——————- ——————- ———- ———– ———– ————-

        2010-07-12 19:12:18 2010-07-12 19:22:18          6           0           0             0

        2010-07-12 19:02:18 2010-07-12 19:12:18          9           0           0             0

        2010-07-12 18:52:18 2010-07-12 19:02:18         47           0           0             0

        2010-07-12 18:42:18 2010-07-12 18:52:18       2136           0           0             1

        2010-07-12 18:32:18 2010-07-12 18:42:18          6           0           0             0

        2010-07-12 18:22:18 2010-07-12 18:32:18        413        1541           0             0

        2010-07-12 18:12:18 2010-07-12 18:22:18        179         938           0             0

        2010-07-12 18:02:18 2010-07-12 18:12:18          6           0           0             0

    –计算undo表空间所需的大小

        SQL> SELECT (

          2    (SELECT MAX(undoblks)/600 * MAX(maxquerylen) FROM v$undostat) *

          3      (SELECT value FROM v$parameter WHERE name = 'db_block_size'))/1024/1024 as Need_Size

          4  FROM dual;


         NEED_SIZE

        ———-

        42.8590625       

    –取消撤销保留选项

        SQL> ALTER TABLESPACE undotbs1 RETENTION NOGUARANTEE;

        Tablespace altered       

六、UNDO配额

        对于超长的事务或不当的SQL脚本将耗用大量的UNDO表空间,使用UNDO表空间配额可以提高资源的利用率

        对于不同组的用户可以分配不同的最大UNDO表空间配额

        当某个组超出了最大的资源限制,则该组不允许新的事务产生,直到当前组的UNDO表空间释放或终止       

七、撤销常见的两个错误

    1.ORA-1555 snapshot too old 快照过旧错误的解决

        配置合适的保留时间(undo_retention)

        调整undo表空间的大小

        考虑保证撤销保留的使用(retention guarantee)       

    2.ORA-30036 unable to extend segment in undo tablespace 无法扩展撤销表空间内的撤销段

        调整undo表空间的大小

        确保大量的事务能够周期性的提交       

八、UNDO涉及的几个相关视图:

        V$TRANSACTION

        V$SESSION

        DBA_ROLLBACK_SEGS   –显示所有的segments

        V$ROLLSTAT

        V$UNDOSTAT

        V$ROLLNAME          –显示当前在线的segments   

        关于UNDO涉及视图的更多信息,请参考oracle的在线文档

      转载自:http://blog.csdn.net/leshami/article/details/5731158

Oracle EBS R12启用HTTPS安全链接(SSL)

        E-Business Suite R12.1.1 provides Advanced Configuration wizards that make it easier to deploy features such as SSL and load-balancing.  Apps administrators can use these wizards to make configuration changes online through Oracle Applications Manager (OAM) and then run AutoConfig on the applications tier to make the changes effective.

       SSL (Secure Sockets Layer) is one of the most commonly used configurations in EBS. I'll walk through the SSL Advanced Configuration Wizard in this article.

Accessing the Advanced Configuration Wizards

Launch the Oracle Applications Manager Site Map using the System Administrator responsibility, then select the AutoConfig link from the Administration tab.


Click on Launch Wizards. It brings up the launch pad for five wizards:

  1. Forms Socket Mode
  2. SSL
  3. SSL Accelerator
  4. HTTP Load Balancing 
  5. OC4J Load Balancing

Start the SSL Configuration Wizard

The OAM General Collection Service must be activated before running any configuration wizards.  From the Administration tab of the Site Map, click on the 'Generic Services' link under the Application Services. Select 'OAM Generic Collect Services' and start it for the target instance. OAM submits a concurrent request for the same. Click on Verify to see if the service starts up fine. Once the service starts, you are ready to use the wizard.

From the Configuration Wizards launch pad, click on the 'Enable' button for SSL.

Select Nodes to be SSL-Enabled

Select the nodes on which you would like to enable SSL and click 'Next.'

2. Set Context variables for SSL

Notice the tip at the bottom of the Parameters screen:  you should make sure that your digital certificates are properly imported into the Wallet of your EBS instance. For details about importing SSL certificates, see:


The wizard sets the following context variables to 'https': 

  • URL protocol
  • Local URL protocol

It also sets values for the 'Web SSL directory' and the 'Active HTTP SSL port.' The subsequent screen gives the current and new values for these variables.

3. Validation

The wizard validates all settings when you click 'Next' after the user comparison of context values screen.  It checks that the Wallet and the required directory structures exist.

Make sure that the Status is 'Success.' Check the log file in the 'View' link for any errors.

4. Confirmation Page

Clicking 'Next' will take you to the Confirmation Page in the train cart. Click on the link below to check the confirmation page.

5. Submit the changes and run AutoConfig

Clicking the 'Submit' button on the Confirmation page displays the next action to be taken. You can review the context file on the applications tier for the changes that have been made. 

The next step is to run AutoConfig to propagate the changes. You need to restart all application services to make the changes effective.

Once the service have been restarted, the EBS instance is ready to be used in SSL mode.

转载自:http://blog.csdn.net/sunansheng/article/details/45848783

Oracle的单点登录解决方案(Single Sign-On Solution)

        Single Sign-On(SSO)即单点登录,在多个应用系统中,用户只需要登录一次就可以访问所有相互信任的应用系统。在此条件下,管理员无需修改或干涉用户登录就能方便的实施希望得到的安全控制。

        Oracle现有两套单点登录的解决方案:Oracle Access Manager,Oracle Single Sign-On Server (OSSO)。
Oracle官方推荐Access Manager作为SSO的解决方案,Oracle Single Sign-On Server的高级用户最终也会建议迁移到Oracle Access Manager解决方案上。

(来源:Note 1461465.2 – Information Center: Overview EBS Technology Stack OID and SSO and OAM)

OAM SSO实现方式有两种:一种是通过OAM Agent(WebGate),另外一种是使用OSSO Agents(mod_osso)

1.) 使用OAM Agent(WebGate代理),然后和Oracle E-Business Suite Access Gate集成(此处以EBS为例).

WebGate是Web服务器的一个插件,用于拦截HTTP请求,并把请求导向Oracle Access Manager (OAM)来获取用户认证。

OAM SSO登陆的过程描述:

When a user tries to access a protected application, the request is received by OAM which checks for the existence of the SSO cookie.

After authenticating the user and setting up the user context and token, OAM sets the SSO cookie and encrypts the cookie with the SSO Server key (which can be decrypted only by the SSO Engine).

Depending on the actions (responses in OAM 11g) specified for authentication success and authentication failure, the user may be redirected to a specific URL, or user information might be passed on to other applications through a header variable or a cookie value.

Based on the authorization policy and results of the check, the user is allowed or denied access to the requested content. If the user is denied access, she is redirected to another URL (specified by the administrator in Webgate registration).

可以看到,Oracle OAM通过Cookie存储用户的信息,进而通过Cookie来实现单点访问授信站点。

2.) 使用mod_osso代理,这种方法只适用于从Oracle Single Sign-On Server 10gR3升级上来的用户。

详细见:About SSO Log In Processing with OAM Agents中的“About SSO Login Log In Processing with OSSO Agents (mod_osso)”

关于Cookie

Cookies就是服务器暂存放在你的电脑里的资料( 用户ID,密码、浏览过的网页、停留的时间等信息),好让服务器用来辨认你的计算机。 当你在浏览网站的时候,Web服务器会先送一小小资料放在你的计算机上,Cookies 会帮你在网站上一些内容都记录下来。当下次你再访问同一个网站,Web服务器会先看看有没有它上次留下的Cookies资料,有的话,就会 依据Cookie里的内容来判断使用者,送出特定的网页内容给你。 一般来说,Cookie通过HTTP Headers从服务器端返回到浏览器上。IE Cookies 文件夹路径保存于注册表:HKEY_CURRENT_USER\Software\Microsoft\Windows\CurrentVersion\Explorer\Shell Folders\Cookies

See Also:

Oracle LDAP解决方案 – Oracle Identity and Access Management Suite :http://blog.csdn.net/pan_tian/article/details/20927733

About SSO Log In Processing with OAM Agents

Overview of Single Sign-On Integration Options for Oracle E-Business Suite [ID 1388152.1]
Integrating Oracle E-Business Suite Release 11i with Oracle Access Manager 11gR2 (11.1.2) using Oracle E-Business Suite AccessGate [ID 1536941.1]

Oracle Access Manager 11.1.2 Certified with E-Business Suite 12 

Oracle Access Manager 11.1.2 Certified With E-Business Suite 11i
Introduction to Installing WebGates

转载自:http://blog.csdn.net/pan_tian/article/details/8691726

Oracle EBS AutoConfig详解

Oracle Apps AutoConfig – Paul's Notes – CSDN博客

一、Background

Oracle Apps的架构非常复杂,使用了非常多技术(或服务)。比如Apache Web server, Apache Jserv, Forms Listener servlet (或forms server) 等等,每一个服务都有着自己的配置文件,只有都设置正确了,系统才能正常运作。而且,Oracle Apps使用了许多的Profile Options(比如Applications Web Agent, Applications Framework Agent等),这些也需要都设置正确,人工管理这么多配置文件,其实并不容易,对于新人来说,学习成本很高。

所以Oracle推出了一个非常强大的工具–Autoconfig(Autoconfig是11.5.4后引入的),用于维护这些配置文件和Profile Options。我们可以认为AutoConfig是一些系列模板化配置文件的集合,用于配置出一个标准化的应用环境。

二、什么是AutoConfig

AutoConfig是集中并简化Oracle Apps的配置管理的工具,一个自动配置EBS Instance的工具,不需要手工干预。它所需要的信息仅仅是两个存储在本地Context文件(XML类型的文件),一个是Apps Context文件,另外一个是DB Context文件。

AutoConfig在Apps层运行的话,那么它就需要读取Apps Context文件来产生所有的配置文件,并且会更新数据库的Profiles。

如果AutoConfig在DB层运行的话,那么它就需要读取DB Context文件来产生所有用于DB层面的配置文件。

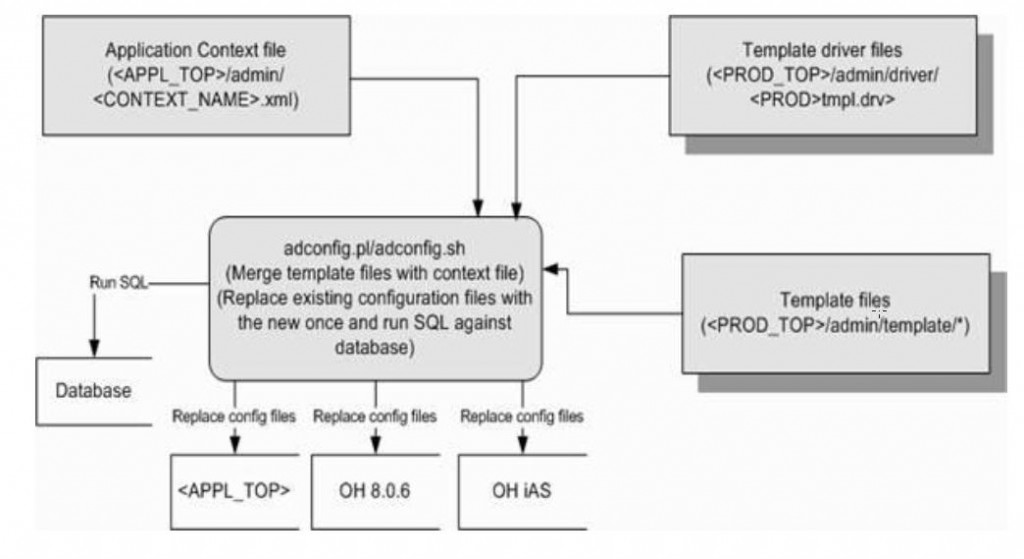
AutoConfig内部其实是一组Java Class文件,这些Class文件由Shell脚本(或者perl脚本)来调用,通过模板化的配置来维护系统的配置文件。Autoconfig运行时,会用新的配置文件重写已存在的配置文件(这个新的配置文件其实是:模板配置文件+context文件,构建而成的)

总之:AutoConfig确实很好的简化了系统的配置工作。

三、AutoConfig脚本所在的目录

Application tier: <INST_TOP>/admin/scripts/adautocfg.sh

                            (eg./u01/oracle/mc3yd213/inst/apps/mc3yd213_bej301441/admin/scripts/adautocfg.sh)

Database tier: <RDBMS_ORACLE_HOME>/appsutil/scripts/<CONTEXT_NAME>/adautocfg.sh

                          (eg./u01/oracle/mc3yd213/db/tech_st/11.1.0/appsutil/scripts/mc3yd213_bej301441/adautocfg.sh)

四、运行方法

Apps Tier:

sh <INST_TOP>/admin/scripts/adautocfg.sh 

注意:

  • 在运行AutoConfig的过程中,Database server和database listener必须已经启动,Apps Server应该处于关闭状态。
  • Running AutoConfig may change your existing environment files. After running AutoConfig, you should always set the environment before you run any Applications utilities, in order to apply the changed environment variables.

DB Tier:

sh <RDBMS_ORACLE_HOME>/appsutil/scripts/<CONTEXT_NAME>/adautocfg.sh

注意:

  • 在运行AutoConfig的过程中,Database server和database listener必须已经启动,其他数据库服务应该处于关闭状态。
  • Running AutoConfig may change your existing environment files. After running AutoConfig, you should always set the environment before you run any Applications utilities, in order to apply the changed environment variables.

五、AutoConfig工作原理

Autoconfig会涉及三类文件:Context文件,Template文件,Driver文件。

六、Context文件

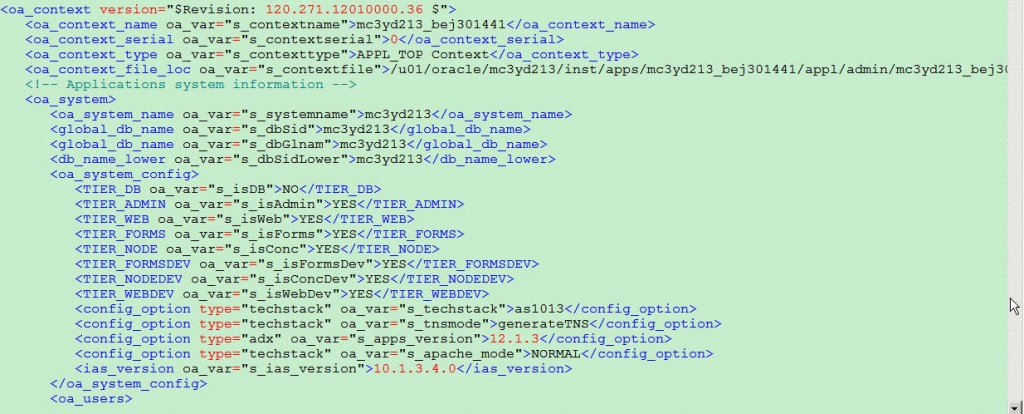
Context文件可以说一个记录环境参数的基础文件,它存储了Apps所有的配置信息,如果需要更改某项配置,则需要首先修改Context文件的配置信息,然后在通过AutoConfig,把更改的信息更新到所有的真实配置文件中去。

Apps Context文件:<INST_TOP>/appl/admin/<CONTEXT_NAME>.xml (eg./u01/oracle/mc3yd213/inst/apps/mc3yd213_bej301441/appl/admin/mc3yd213_bej301441.xml)

DB Context文件:<RDBMS_ORACLE_HOME>/appsutil/<CONTEXT_NAME>.xml(eg./u01/oracle/mc3yd213/db/tech_st/11.1.0/appsutil/mc3yd213_bej301441.xml)

NOTE:<CONTEXT_NAME> = <SID>_<hostname>

七、AutoConfig模板文件

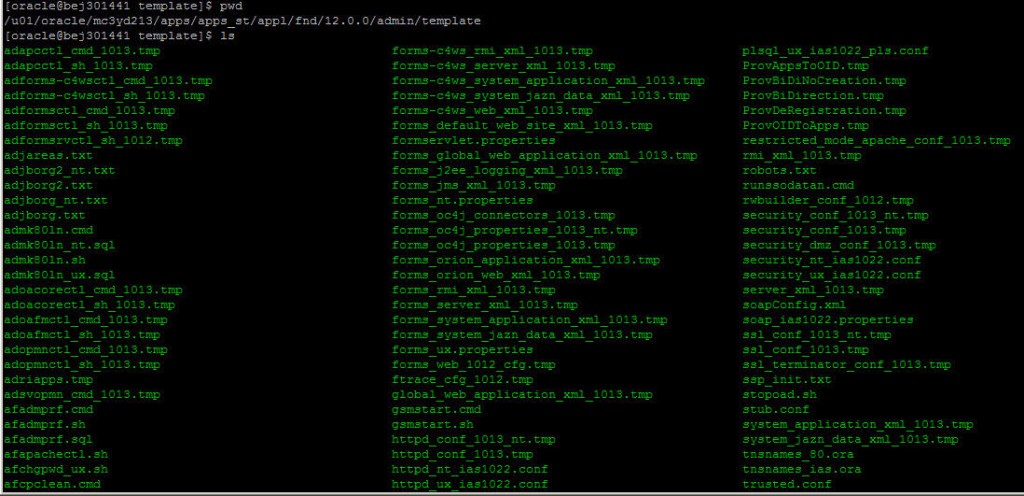
用于生成配置文件的模板,Apps里的每一个配置文件都有一个对应的模板。模板文件中包含了很多的Tag,这些Tag最终会被Context文件中环境变量替换掉。

模板文件存放的地方: 

Apps层的模板文件:<product_top>/admin/template,比如: <FND_TOP>/admin/template (eg./u01/oracle/mc3yd213/apps/apps_st/appl/fnd/12.0.0/admin/template,打开目录能看到很多tmp的模板文件)


DB层的模板文件:<RDBMS ORACLE_HOME>/appsutil/template,比如<ORACLE_HOME>/appsutil/template(eg./u01/oracle/mc3yd213/db/tech_st/11.1.0/appsutil/template)


八、driver文件

Driver文件会列出了AutoConfig模板文件路径以及模板文件对应的目标配置文件的真实路径,以及一些脚本命令。

Apps的Driver文件位于:<product_top>/admin/driver,比如: <FND_TOP>/admin/driver(eg./u01/oracle/mc3yd213/apps/apps_st/appl/fnd/12.0.0/admin/driver,里边有很多.drv文件)

DB的Driver文件位于:<RDBMS ORACLE_HOME>/appsutil/template,比如<ORACLE_HOME>/appsutil/template(eg./u01/oracle/mc3yd213/db/tech_st/11.1.0/appsutil/template里的.drv文件)

每当Autoconfig运行的时候,都会在先找到Driver文件,然后按照Driver文件提供的脚本命令,模板文件,以及Context文件生成目标配置文件。

九、AutoConfig的日志文件

Application Tier: <INST_TOP>/admin/log/<MMDDhhmm>


Database Tier:   <RDBMS ORACLE_HOME>/appsutil/log/<CONTEXT_NAME>/<MMDDhhmm>

                          eg./u01/oracle/mc3yd213/db/tech_st/11.1.0/appsutil/log/mc3yd213_bej301441/05240310

<MMDDhhmm> = (month, day, hour, minute of AutoConfig run)

十、AutoConfig配置回滚

每一次AutoConfig的运行都会产生一个回滚脚本,如果AutoConfig配置错误,你可以使用回滚脚本来恢复之前的配置。

Application Tier:     <INST_TOP>/admin/out/<MMDDhhmm>
Database Tier:    <RDBMS ORACLE_HOME>/appsutil/out/<CONTEXT_NAME>/<MMDDhhmm>
并且运行命令:  restore.sh(Unix) 或者restore.cmd(Windows)

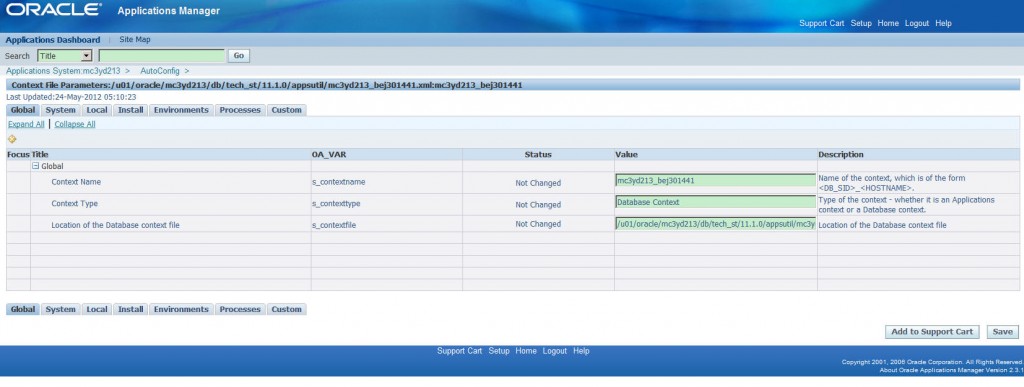
十一、Autoconfig Context文件的修改

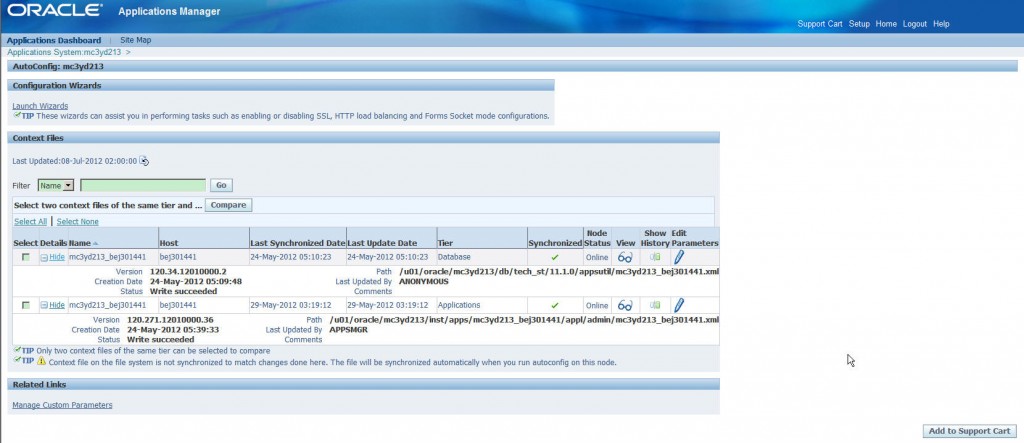
路径:System Administration > Oracle Applications Manager > AutoConfig
从列表中可以看到DB层和Apps层的Autoconfig Context文件

点击Edit Parameter,可以在这里修改Context File的Parameter,在这里改Context文件应该比直接修改Context的XML文件更安全些。

从截图的页签,也可以看出,Autoconfig Context的配置主要涉及到Global,System,Local,Install,Environments,Processes,Custom几块。

十二、Reference about AutoConfig

http://www.appsdba.info/docs/oracle_apps/R12/AutoConfig.pdf

387859.1  Using AutoConfig to Manage System Configurations in Oracle Applications Release 12

Autoconfig in Oracle Apps 11i / R12 / 12i

165195.1  Using AutoConfig to Manage System Configurations with Oracle Applications 11i

218089.1  Autoconfig FAQ
270519.1  Customizing an AutoConfig Environment
364927.1 How To Run Autoconfig On Database Tier (DB-Tier)
341322.1 How to change the hostname of an Applications Tier using AutoConfig
338003.1 How to change the hostname and/or port of the Database Tier using AutoConfig
315674.1 How To Verify if Autoconfig is Enabled on 11.5.x
391406.1 How to get a clean Autoconfig Environment

转载自:http://blog.csdn.net/sunansheng/article/details/46501335